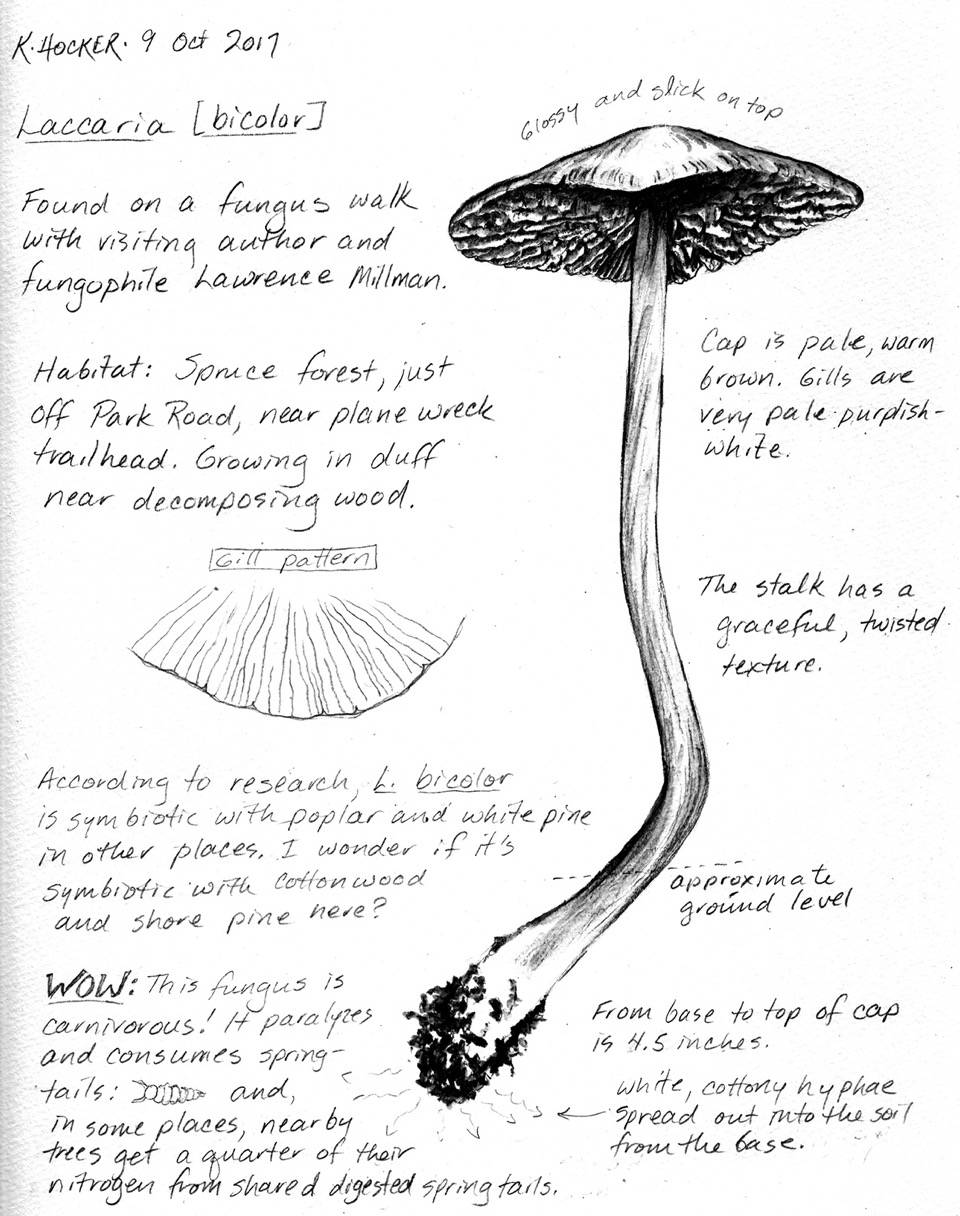
Observation is fundamental to science. In fact, one could even argue that science is observation, nourished and channeled for the purpose of better understanding what our world is and how it works. Observations inspire science investigations, shape experimentation, support or disprove hypotheses, frame conclusions. As STEM educators, and as parents and mentors, it’s important to encourage, model and teach observation skills.
It’s not a difficult task … the spark is already there! Kids delight in observation and discovery (as anyone knows who has visited a stream, a forest trail, or a garden with a young friend). They’re natural seekers and investigators: peering under rocks, touching leaves and spiderwebs, testing the aerodynamics of winged seeds. The process of science captures those sparks of delight and attention and allows them to become flame.
One bedrock tool of the science/observation process is the science notebook — a place to record observations, ideas and questions. And one key element in a notebook — especially in the natural sciences — is drawing. This is sometimes called “field sketching” (though it doesn’t have to be done outdoors).
Field sketching is a powerful way to practice observation skills. The process of drawing from observation deepens the observation process itself, allowing us to engage our whole minds as we draw the subject of our study through eyes and mind and onto the page. Drawings are a form of data: in fact, they often capture information that can’t easily be described in words. We can go back to journal sketches and notes to remind ourselves of previous observations, and build on them. Journal entries can also help us communicate more clearly about our observations.
Beginning your field sketching practice starts by establishing field journals. Make sure each child has her/his own book …and that you do as well! Some people like to make their own journals — easy to do with loose-leaf plain paper, heavy paper for the cover, and a stapler or needle and thread for the binding. Paper type is a personal preference; slightly heavier drawing paper will hold up better to raindrops and backpacks. Some like to use waterproof paper; just be aware that it does tend to smudge more easily than regular paper. If you choose to use a commercial sketchbook, I recommend a hard back and spiral binding, so that it can lie flat.
Although you can incorporate pen, colored pencils and even water media in field journals, all you really need in your starter kit is a pencil — mechanical or regular with a hand-held sharpener. Add a magnifying glass and a binder clip for holding pages open on windy days, tuck the lot into a large reclosable plastic bag, and you have a field sketch kit ready.
You and your student may want to draw as a way to explore a particular subject, such as bivalves, trees or birds — or to record repeated observations from a place such as a backyard or a favorite beach. Or you may want to just let curiosity lead the way. Whatever your approach, here are some tips to get started:
• When you find your subject, try to take at least 10 or 15 minutes to study it before you even set pencil to paper. This will allow the subject at hand to displace any inaccurate pictures you might carry in your brain.
• When drawing with a student, talk together about what you see and how you plan to draw it. What shapes, lines and textures do you see? What part will you draw first? How big will you draw it?
• As you draw, take breaks to stretch, step back, and just observe for a while.
• If you’re frustrated with a drawing, stop for a while and observe it. Compare it to the subject. Look for parts that you want to keep and parts that you want to change. Make a plan for how you can change them to make your sketch more true to life.
• Before you move on to another subject or drawing, look again — what other details can you add?
• It’s OK to start over again! Each time you draw something, you not only get better at drawing it, you understand it better.
Notes are an essential part of a field journal. They express things about your experience that you can’t include in a drawing, or that you don’t have time or skills to capture completely. At the very minimum, label each journal page with your name or initials (the observer), the date, and the subject or subjects. Beyond that, think of field journal notes in three categories: observations, inferences, and questions. Put another way: what did you see/hear/feel/smell? What do you infer about your subject? What do you wonder about your subject?
Below are some field sketching activity suggestions to get you started. For more inspiration and ideas, try a Google image search for “field sketching” or “nature drawing.” Check out the outstanding internet resources at https://johnmuirlaws.com and http://naturesketchers.blogspot.com. There are many more.
And finally: after you and your student have spent time drawing and writing in your field journals, take some time to share your observations. Ask your student to show you her or his drawings and notes, or if s/he wants to keep those pages private, ask for a verbal description of what s/he observed, thought and wondered. What are some questions that could be investigated through further observations or experiments? Every once in a while, page back to journal entries from weeks, months, or years ago. What have you learned since then? How has your drawing style changed?
• Kathy Hocker is an artist, author and illustrator who works with students as an artist-in-residence in Juneau and throughout Southeast. She lives in Gustavus. STEM Corner is a monthly column about Science Technology Engineering and Math in Juneau, written by a rotating group of Juneau STEM Coalition members.

